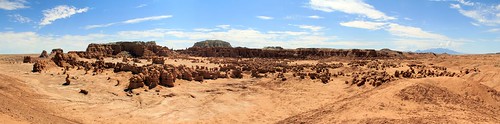
An approximately 45 megapixel panorama of Goblin Valley State Park in Utah. It took me a bit of playing around with it, but I thought the stitch came together pretty well and provided a cool view of the plethora of "goblins" that were there. Definitely a unique place!
Stitched together with DoubleTake.
Tuesday, October 9, 2012
Goblin Valley Panorama
Wednesday, October 3, 2012
Repurposing an old Android phone as a portable gaming device - Part 1
Recently, I have been interested in a platform for mobile gaming. I kinda lost interest in my old DS, and my Droid 4's battery life goes from shoddy to downright abysmal with just a little bit of gaming. I heavily considered a PS Vita, but it is still a bit more of an investment than I'm willing to make at the moment. Then I found this guide on Lifehacker for turning an android device into a media/gaming center. I didn't necessarily need everything described in the guide, but I figured it was a good place to start using my old Droid 3. First I decided to focus on setting up the NES emulator first. I have played around with a few in the past that worked pretty well, but both the software controls and using keys on the hardware keyboard were lacking. I rarely use both my PS3 controllers, so I decided to see if I could use the one that is starting to wear down with my phone. So I decided to try out Sixaxis Controller by Dancing Pixel Studios. It is handy that is has a free app that tests your device then the actual app is only $1.99, which is pretty reasonable. To pair the controller with my phone, I had to install libusb then use sixpair to tell the controller the ID of my phone. It was pretty simple and painless. 
[caption id="attachment_1528" align="aligncenter" width="600"] Booting up some Mega Man 2![/caption]
 I played a few games, and the controller was pretty responsive and a great step up from playing on my phone. My phone was fine for games like Dragon Warrior where it is never necessary to act quickly. One game of Tecmo Super Bowl and I realized how subpar trying to use the keyboard actually was. So with pretty minimal setup and $1.99 I had a nice little emulator that I could hook to any TV with HDMI and play with a wireless controller. Nice! Phase two of making this into a DS/PS Vita alternative will be fashioning a mount like the Gameklip. While it really isn't too expensive ($15 + a likely shipping charge), I believe I could put together something fairly easily that would cost me a lot less. My first thought is to just refashion my car mount to connect to the controller. It may be a little bulky, but I'll sacrifice a little space for it being practically free! (or pre-paid I guess, haha) Additionally, I imagine I should be able to get at least a SNES emulator running, maybe Genesis too. There's also the standard Android game library (Angry Birds, etc.) that I can use. If I think I'll be using those much I may want to put a little more thought into make the mount for the PS3 controller fairly easy to remove. The only real thing that is lacking, which is pretty minor, is that the PS Vita ties in with your PSN account for trophies and such. While I admit it is kinda silly, I can't say I would be disappointed if some kind of trophy system was released for Android. Or even better, Sony released a tie-in so Android developers could actually earn PSN trophies!

 Booting up some Mega Man 2![/caption]
 Friday, September 21, 2012
Building my own media server
First, I'm going to go ahead an apologize for the sheer text in this post. I was so focused on getting everything together that I didn't really take any build pics so this will be mostly text. Sorry about that! Continue at your own risk ;-) Background I have a growing media collection on my home computer and I have been looking at better ways to disseminate it to other devices in my home. Since I have a PS3 and my DVR can access DLNA servers, I spent a little time trying to get a server running on my old mac mini using TVMOBiLi. It seemed to work ok for a bit (though the way files were organized was sub-par), but then I started having issues. They likely stemmed from my mac mini dying, but I had reservations about TVMOBiLi anyhow since the free version actually had a data cap for streaming. Since I don't usually need to watch movies immediately, I just set up a script to generate a web page of links to movie files then accessed the webpage through the PS3 browser. Then I would just download the file beforehand, watch it locally on the PS3, then delete the file. While it only took 20-30 minutes to download a ~2 hour movie, the playback if I tried to watch while downloading was abysmal. So that was pretty much the way things worked for a while. Then my iMac started filling up! I figured it was just about time to set up a separate media server, preferably DLNA-compatible so that I could more easily stream to our TVs. The Build I started with the small but more costly from this guide on Lifehacker. I really wanted a small form factor box, but wanted to put at least 2 drives in it so I could have a primary and a backup since I'd be moving a lot of the media off my iMac, and it is never good to have anything you want to keep stored in only one place. So the basic breakdown of what I got was as follows:  4 Hot-swappable drive bays are handy[/caption] [caption id="attachment_1507" align="aligncenter" width="600"]
 One might call me a cable management guru[/caption] The Setup I had previously read about several programs that ran on linux so I figured I would start out with a basic linux installation and go from there. Since I don't have an optical drive, I had to install via usb flash drive. I thought this would be pretty simple, but it didn't go as smoothly as I had hoped. I downloaded the Ubuntu Server iso and tried to load it following this guide. I never got the result of that to boot, so I looked around some more and switched to using UNetbootin to make it and had much better luck. I got Ubuntu server installed, then was playing around with it some and decided I'd rather have a little more than a command line while I was first getting things set up so I switched to the standard Ubuntu install. The first program that I had read about was PS3MediaServer. I actually got it up and running fairly easily. I copied a few movie files over then tested it out through the PS3. At first, I thought the files weren't appearing, but further inspection turned them up a few directories below where I thought they'd be. A lot of the videos I have are .m4v files, which are playable on the PS3 and shouldn't cause any issues. For some reason, PS3MediaServer had them in a subdirectory labeled "transcode" as though it was having to convert them on the fly. That, plus the fact that the basic organization was pretty crappy (lots of different folders and subfolders to look through to access any of the movies) spurned me to evaluate some other options. The next thing I looked at was GeexBox. Instead of just a program that you run, GeexBox is a full mini-OS to run. I obviously didn't read all the documentation because I tried for a while (to no avail) to install the OS over my Ubuntu install when, it turns out, GeexBox is meant to be run from the usb drive. They are working on the ability to actually install it like a typical linux distribution, but that is only in the development build (though I couldn't get it to actually install). Since that was coming, I decided to try it out as it is currently meant to run and it was ok. It looked like running XBMC on linux and the organization was ok from what I could tell, but ultimately I wanted a little more freedom and definitely didn't want to have to keep a usb drive plugged in all the time. If I had been setting this box up to be directly connected to the TV, I think I would have given GeexBox a little more testing, but for the goal I had in mind it didn't quite handle my needs. Thus I decided to revert back to Ubuntu to try more application-based options. The next one that I tried was MiniDLNA. This sounded appealing because it is a pretty bare-bones DLNA compliant server so it seemed like organization would be up to me and, therefore, I would have more freedom to set things up like I wanted. Unfortunately, I could never get it to share the actual media. I changed the config file, shutdown and restarted the server, shut down and restarted the computer, and it would still just display basic "Music,Video, Photos" folders (that were empty) when the config only had one directory where my movies were stored. As you have probably guessed, I wasn't in the mood for posting in forums and waiting for an answer. I DID look in forums and documentation for issues I had with each server, but none were helpful and I wanted something that came much closer to working right off the bat. The next option turned out to be the one I am sticking with for the time being, Serviio. It is free, though you start with a 15 day trial of the $25 Pro version, after which you just revert back to the free version. From looking over the list of features, I believe that the free version will suit all my needs (though the MediaBrowser web-based player and API for access over the internet could come in handy). It started up without fuss and had a nice GUI console to modify settings and such. It actually listened when I added folders to be included and seemed to keep things fairly organized. One of my favorite features of Serviio was that it queries a database for metadata based on the name of the file. This is handy because it means that I can browse content by information that I would never take the time to input (year released, director, etc.). I've encountered a couple of glitches, but for the most part my test files were found without much incident. The first glitch was with the movie X-Men. Now if you have a file named X-MEN.m4v, you would think the logical match would be for the movie X-Men, but the database kept identifying it as X-Men:First Class. I tried multiple variations and the only thing that worked was to rename it to X-MEN(2000).m4v so it would use the release date. Some of the misnamings are super random. For example, I had a file name PATCH_ADAMS.m4v and when Serviio tried to automatically determine what movie it was, it chose 101 Dalmations II- Patch's London Adventure. That's not even close! The other glitch was with season 1 of Star Trek: The Next Generation (as if this post didn't sound geeky enough). I tried numerous different naming schemes, but was never able to find one that enables it to find the appropriate entry in the database at first. I decided to go ahead and transfer all my regular movies over and, unfortunately, it did a pretty abysmal job in automatically finding the metadata. One thing that really irks me is that underscores seem to trip it up and it likes spaces instead. SPACES!? I am on a linux box, not some stupid windows POS. I don't put damn spaces or parentheses in my file names. If I have to escape characters to reference a file, THAT FILE IS NAMED INCORRECTLY! How annoying. I found a file renamer called FileBot that queries the online databases then provides options. It has it's own issues, but it let me get a lot of my files in a different naming state which seemed to help Serviio get a lot more of them correct. It also seemed to fix the issue I was having with Star Trek TNG, so that's pretty awesome. Luckily, I found a forum post where a user manually updated the derby database storing the file information for the files. I haven't tried it yet, but I'm hoping that allows me to correct all the errors in movie identification that I have left. It got enough of them done that I think I'm just going to gradually repair everything and be more cognizant of my naming scheme for future movies. Other than the movie misidentifications, the only other thing I have found with Serviio that I don't like is that my Moxi doesn't seem to be able to view it. I am not sure why, and it doesn't really matter since the PS3 and Moxi are connected to the same TV. I just found it odd because I thought the Moxi looked for DLNA servers, but perhaps TVMOBiLi that I used initially actually offers more protocols and that is why it was accessible. I have enough going on that I don't really care to try to find out. If I make any significant changes to my setup, I will put together another post about it. :-) Final Tweaks After I got the server in a (mostly) working state, there were a few things I wanted to go to make its use run a little more smoothly. The first couple were the obvious things like set up Serviio to run upon boot and set up my iMac so it can communicate back and forth with the media server without a password (useful since the iMac will still be my primary ripping computer and I can set them up to automatically sync). Then I found this guide to using avahi to allow me to use an actual name for the media server. I may end up setting it up for more general file hosting and it will be nice to not have to deal with ip addresses for access from various devices. While I will probably do most administrative stuff through ssh, I went ahead and set up a VNC server so I could pull up a remote desktop if I felt like it. Pretty simple to set up. I also set up a new directory for DVD rips and set up a cron job on the media-server to check that directory daily and grab any new files. For now I will just deal with clearing them out on my own once I'm sure everything else is working well. One tweak that I thought would be minor but turned out to be a pain the ass was getting the media server to shut down when I shut down my iMac. Whenever I am out of town, I always power down my computer and, especially since I'll be running the server headless, I wanted to save me the step of trying to remember to shut it down before I shut down my iMac. I knew that I could send the shutdown command remotely from my iMac, so I figured it should be pretty simple to call a script on shutdown/logout. Turns out that isn't simple at all. I tried using rc.local.shutdown/rc.shutdown.local, adding a service to StartupItems, and played around with launchd. None of these would call the script upon shutting down. After wrestling with it for a bit, I decided to approach it from the other side and actually got it running fairly quickly. While the ip can change because it uses DHCP, the name of my iMac (its .local address) seems to stay pretty consistent. So I set up a cronjob that calls a simple script that I wrote. The script simply pings my iMac and if the ping fails I assume the iMac is off so it shuts down the computer. Hopefully my internal network is consistent enough that this won't be an issue, especially since it just checks once an hour, but my initial testing shows that it is working fine. [caption id="attachment_1508" align="aligncenter" width="600"]
 At home in the cubby[/caption] To Do List
- ARK ITX/CS-CI03 Black Mini ITX Server Chassis
- ASRock A75M-ITX FM1 AMD A75 Motherboard
- AMD A4-3400 Liano 2.7GHz Dual Core Processor
- 4 GB DDR3 RAM
- 2 Western Digital Caviar Green WD20EARX 2TB hard drives
 4 Hot-swappable drive bays are handy[/caption] [caption id="attachment_1507" align="aligncenter" width="600"]
 One might call me a cable management guru[/caption] The Setup I had previously read about several programs that ran on linux so I figured I would start out with a basic linux installation and go from there. Since I don't have an optical drive, I had to install via usb flash drive. I thought this would be pretty simple, but it didn't go as smoothly as I had hoped. I downloaded the Ubuntu Server iso and tried to load it following this guide. I never got the result of that to boot, so I looked around some more and switched to using UNetbootin to make it and had much better luck. I got Ubuntu server installed, then was playing around with it some and decided I'd rather have a little more than a command line while I was first getting things set up so I switched to the standard Ubuntu install. The first program that I had read about was PS3MediaServer. I actually got it up and running fairly easily. I copied a few movie files over then tested it out through the PS3. At first, I thought the files weren't appearing, but further inspection turned them up a few directories below where I thought they'd be. A lot of the videos I have are .m4v files, which are playable on the PS3 and shouldn't cause any issues. For some reason, PS3MediaServer had them in a subdirectory labeled "transcode" as though it was having to convert them on the fly. That, plus the fact that the basic organization was pretty crappy (lots of different folders and subfolders to look through to access any of the movies) spurned me to evaluate some other options. The next thing I looked at was GeexBox. Instead of just a program that you run, GeexBox is a full mini-OS to run. I obviously didn't read all the documentation because I tried for a while (to no avail) to install the OS over my Ubuntu install when, it turns out, GeexBox is meant to be run from the usb drive. They are working on the ability to actually install it like a typical linux distribution, but that is only in the development build (though I couldn't get it to actually install). Since that was coming, I decided to try it out as it is currently meant to run and it was ok. It looked like running XBMC on linux and the organization was ok from what I could tell, but ultimately I wanted a little more freedom and definitely didn't want to have to keep a usb drive plugged in all the time. If I had been setting this box up to be directly connected to the TV, I think I would have given GeexBox a little more testing, but for the goal I had in mind it didn't quite handle my needs. Thus I decided to revert back to Ubuntu to try more application-based options. The next one that I tried was MiniDLNA. This sounded appealing because it is a pretty bare-bones DLNA compliant server so it seemed like organization would be up to me and, therefore, I would have more freedom to set things up like I wanted. Unfortunately, I could never get it to share the actual media. I changed the config file, shutdown and restarted the server, shut down and restarted the computer, and it would still just display basic "Music,Video, Photos" folders (that were empty) when the config only had one directory where my movies were stored. As you have probably guessed, I wasn't in the mood for posting in forums and waiting for an answer. I DID look in forums and documentation for issues I had with each server, but none were helpful and I wanted something that came much closer to working right off the bat. The next option turned out to be the one I am sticking with for the time being, Serviio. It is free, though you start with a 15 day trial of the $25 Pro version, after which you just revert back to the free version. From looking over the list of features, I believe that the free version will suit all my needs (though the MediaBrowser web-based player and API for access over the internet could come in handy). It started up without fuss and had a nice GUI console to modify settings and such. It actually listened when I added folders to be included and seemed to keep things fairly organized. One of my favorite features of Serviio was that it queries a database for metadata based on the name of the file. This is handy because it means that I can browse content by information that I would never take the time to input (year released, director, etc.). I've encountered a couple of glitches, but for the most part my test files were found without much incident. The first glitch was with the movie X-Men. Now if you have a file named X-MEN.m4v, you would think the logical match would be for the movie X-Men, but the database kept identifying it as X-Men:First Class. I tried multiple variations and the only thing that worked was to rename it to X-MEN(2000).m4v so it would use the release date. Some of the misnamings are super random. For example, I had a file name PATCH_ADAMS.m4v and when Serviio tried to automatically determine what movie it was, it chose 101 Dalmations II- Patch's London Adventure. That's not even close! The other glitch was with season 1 of Star Trek: The Next Generation (as if this post didn't sound geeky enough). I tried numerous different naming schemes, but was never able to find one that enables it to find the appropriate entry in the database at first. I decided to go ahead and transfer all my regular movies over and, unfortunately, it did a pretty abysmal job in automatically finding the metadata. One thing that really irks me is that underscores seem to trip it up and it likes spaces instead. SPACES!? I am on a linux box, not some stupid windows POS. I don't put damn spaces or parentheses in my file names. If I have to escape characters to reference a file, THAT FILE IS NAMED INCORRECTLY! How annoying. I found a file renamer called FileBot that queries the online databases then provides options. It has it's own issues, but it let me get a lot of my files in a different naming state which seemed to help Serviio get a lot more of them correct. It also seemed to fix the issue I was having with Star Trek TNG, so that's pretty awesome. Luckily, I found a forum post where a user manually updated the derby database storing the file information for the files. I haven't tried it yet, but I'm hoping that allows me to correct all the errors in movie identification that I have left. It got enough of them done that I think I'm just going to gradually repair everything and be more cognizant of my naming scheme for future movies. Other than the movie misidentifications, the only other thing I have found with Serviio that I don't like is that my Moxi doesn't seem to be able to view it. I am not sure why, and it doesn't really matter since the PS3 and Moxi are connected to the same TV. I just found it odd because I thought the Moxi looked for DLNA servers, but perhaps TVMOBiLi that I used initially actually offers more protocols and that is why it was accessible. I have enough going on that I don't really care to try to find out. If I make any significant changes to my setup, I will put together another post about it. :-) Final Tweaks After I got the server in a (mostly) working state, there were a few things I wanted to go to make its use run a little more smoothly. The first couple were the obvious things like set up Serviio to run upon boot and set up my iMac so it can communicate back and forth with the media server without a password (useful since the iMac will still be my primary ripping computer and I can set them up to automatically sync). Then I found this guide to using avahi to allow me to use an actual name for the media server. I may end up setting it up for more general file hosting and it will be nice to not have to deal with ip addresses for access from various devices. While I will probably do most administrative stuff through ssh, I went ahead and set up a VNC server so I could pull up a remote desktop if I felt like it. Pretty simple to set up. I also set up a new directory for DVD rips and set up a cron job on the media-server to check that directory daily and grab any new files. For now I will just deal with clearing them out on my own once I'm sure everything else is working well. One tweak that I thought would be minor but turned out to be a pain the ass was getting the media server to shut down when I shut down my iMac. Whenever I am out of town, I always power down my computer and, especially since I'll be running the server headless, I wanted to save me the step of trying to remember to shut it down before I shut down my iMac. I knew that I could send the shutdown command remotely from my iMac, so I figured it should be pretty simple to call a script on shutdown/logout. Turns out that isn't simple at all. I tried using rc.local.shutdown/rc.shutdown.local, adding a service to StartupItems, and played around with launchd. None of these would call the script upon shutting down. After wrestling with it for a bit, I decided to approach it from the other side and actually got it running fairly quickly. While the ip can change because it uses DHCP, the name of my iMac (its .local address) seems to stay pretty consistent. So I set up a cronjob that calls a simple script that I wrote. The script simply pings my iMac and if the ping fails I assume the iMac is off so it shuts down the computer. Hopefully my internal network is consistent enough that this won't be an issue, especially since it just checks once an hour, but my initial testing shows that it is working fine. [caption id="attachment_1508" align="aligncenter" width="600"]
 At home in the cubby[/caption] To Do List
 - Clean up the metadata so all the videos are displayed with the proper information
- Transfer and organize the other videos I have on my computer
- Set up media server to back up all files onto 2nd drive
- Figure out why the fans on the case seem to be running constantly even though it isn't overheated
- See if I can have the iMac automatically boot the media server on startup (i.e. when I get back from out of town I only have to start the iMac)
- Work on organizing and ripping more of the TV seasons that I have
- Set up basic webserver so that any device on the network can at least access/download files
Wednesday, September 12, 2012

Saturday, September 8, 2012

Enjoying a hearty groomsmen brunch with Josh and the crew at Loveless Cafe.
 Yes, that's a big pile of pork barbecue sitting on a pancake flanked by scrambled eggs with a side of hash brown casserole.
 Wednesday, August 15, 2012
Father/Son Trip - Utah, Arizona, and Vegas
Dad needed a vacation and I somehow convinced my lovely wife to let me join him for another one of our crazy guy vacations! Dad had never explored much of southern Utah, and I had really only passed through Zion during one of my college road trips with Bobby so it was time to explore some new territory! Needless to say, this post is gargantuan and extremely picture-laden, so grab that beverage and get ready for the long haul! :-) Day 1 We were both up early to head out of our respective locations and met up in Atlanta then continued on to Las Vegas. Both of my flights were actually early! We had a pretty drive (through many a carved out road). [caption id="attachment_1359" align="aligncenter" width="600"] "Let's just make the road go straight through that ridge."[/caption] On the way we just happened to stop for snacks at the same exit as the exotic car driving experience. If we are ever back out this way, we'll definitely have to add that to the activity list! [caption id="attachment_1358" align="aligncenter" width="600"]
 Checking out some awesome cars[/caption] We got to St. George, checked in, then headed to Red Lobster, which was surprisingly jammed for 4:30 in the afternoon. We had the slowest frickin' service ever, and the only quick thing was when he showed up to spill a beer. 1 hr and 45 minutes to eat an early dinner at Red Lobster! When we finally finished, we grabbed some beer and wound down at the hotel. Day 2 Woke up bright and early and drove down to the North Rim of the Grand Canyon. [caption id="attachment_1360" align="aligncenter" width="600"]
 The first of many sunrises seen from the road[/caption] We took the Bright Angel Point Trail (very short), which was a crazy little hike along the top of a spine extending out into the canyon so there was a huge dropoff on either side. http://www.youtube.com/watch?v=zgEA2kZ8cGo&w=600&h=338 The views were amazing, and we timed it perfectly so we just barely beat the crowds. [caption id="attachment_1361" align="aligncenter" width="600"]
 Dad on the trail[/caption] [caption id="attachment_1362" align="aligncenter" width="600"]
 One heckuva background![/caption] [caption id="attachment_1403" align="aligncenter" width="600"]
 Stitched Panorama from the North Rim[/caption] [caption id="attachment_1363" align="aligncenter" width="600"]
 A fairly tame (and obviously well-fed) squirrel[/caption] From there we headed to Kayenta and had an amazing and scenic drive on the way. Everything was just so amazing and so ridiculously different than anything in Tennessee or Florida. We stopped briefly in Kayenta then headed on to Monument Valley. It is a crazy set of HUGE rock outcroppings and was simply spectacular. [caption id="attachment_1364" align="aligncenter" width="600"]
 One of many views from the road[/caption] [caption id="attachment_1365" align="aligncenter" width="600"]
 Creeping up on Monument Valley[/caption] [caption id="attachment_1366" align="aligncenter" width="600"]
 Crazy rock features[/caption] After we took that in, we moseyed back to Kayenta. After stopping at 3 separate places, we finally discovered that there is no beer/alcohol sold in Kayenta because it is on the Navajo reservation. This didn't sit too well, especially with Dad, so we drove back through Monument Valley to Mexican Hat, which was the closest place with beer sales. [caption id="attachment_1367" align="aligncenter" width="600"]
 Heading back through Monument Valley[/caption] We had dinner there, and their alcohol provisions swayed Dad to remain so we ended up staying there and just having a relaxing evening in our tiny little room. [caption id="attachment_1368" align="aligncenter" width="600"]
 Our cozy little inn in Mexican Hat[/caption] It was nice to not have to drive an additional 40 miles after dinner and saved us another 40 miles of driving the next day. While all the views were amazing, one of our favorite moments came after we had settled in at the motel in Mexican Hat. Dad had the following conversation. Dad: Hello, I was calling to get the wifi password. Front Desk Lady: Ok, come down and I will enter it for you Dad: I'm sorry, what? Front Desk Lady: You need to bring your computer here so I can type in the password for you. If I tell it to you, the maids will get it and they go across the river and use up all the internet.That's right. Those dadjum maids use ALL the internet. And they don't even have the decency to stay on this side of the river! The things that go on in this bustling metropolis of Mexican Hat (population: ~100). Day 3 We woke up early and hit the road to the first lookout that was not too far from Mexican Hat (place close to Muley Point). [caption id="attachment_1378" align="aligncenter" width="600"]
 Sunrise over Mexican Hat[/caption] [caption id="attachment_1379" align="aligncenter" width="600"]
 A fuzzy pic of the rock formation for which Mexican Hat is named[/caption] [caption id="attachment_1395" align="aligncenter" width="600"]
 The rivers around here seem pretty busy, what with all the canyon carving and all[/caption] We enjoyed a nice sunrise view then continued on towards Natural Bridges National Monument. The map didn't provide the necessary info for us to realize exactly what was entailed in that little commute. As you may have noticed from some of the pictures thus far, there are tons of enormous mesas in this part of the country. Well this drive took us basically right up the face of one of those. They basically carved out a zigzag road right up the face of it so we could get to the top and continue on. It was pretty intense! [caption id="attachment_1380" align="aligncenter" width="600"]
 Um... Where does the road go?[/caption] [caption id="attachment_1381" align="aligncenter" width="600"]
 Oh that's right. Straight up the side of this cliff![/caption] After that it was smooth sailing until we reached Natural Bridges. It was basically a small loop to drive with short walks out to see each bridge. Nature creates some pretty amazing things! [caption id="attachment_1382" align="aligncenter" width="600"]
 Sipapu Bridge[/caption] [caption id="attachment_1383" align="aligncenter" width="600"]
 Kachina Bridge[/caption] [caption id="attachment_1384" align="aligncenter" width="600"]
 Owachomo Bridge[/caption] After Natural Bridges, we moseyed towards Hanksville. On the way, we stopped at an amazing overlook of Lake Powell, a location I have seen in a few wakeboarding videos. [caption id="attachment_1385" align="aligncenter" width="600"]
 Now where'd that wakeboard boat go...[/caption] After some pics we drove on to Hanksville, had lunch, then headed north to Goblin Valley. What a cool little set of rock formations! [caption id="attachment_1405" align="aligncenter" width="600"]
 A little trio of goblin greeters[/caption] [caption id="attachment_1406" align="aligncenter" width="600"]
 Panorama of all the little goblins[/caption] We were both constantly amazed how every turn seemed to reveal a unique and beautiful landscape. [caption id="attachment_1387" align="aligncenter" width="600"]
 We're definitely not in Florida/Tennessee anymore[/caption] From there it was back through Hanksville to Capitol Reef National Park. We took the main scenic road, then continued on to the dirt road to Capitol Gorge. It was a pretty fun exploration, and we got out for a nice little hike. We saw the petroglyphs and where some early settlers had carved their names into the rock. [caption id="attachment_1389" align="aligncenter" width="600"]
 Off-roadin'![/caption] [caption id="attachment_1390" align="aligncenter" width="360"]
 Exploring the canyon[/caption] [caption id="attachment_1391" align="aligncenter" width="360"]
 They don't look that huge in pictures until you have someone in there for a frame of reference[/caption] It was nice to get out and walk around, but when that sun comes out it gets blazing in a hurry! We made our way back through the scenic way then took the main road to panoramic point. Got some pics then finished our drive to Torrey. Had a nice dinner with some refreshing cold beers, then got settled in for a relaxing evening at the hotel. Another long, but awesome, day of spectacular views! Day 4 Today we slept in a bit (by our standards), had a little breakfast at the hotel then hit the road and went through Grand Staircase-Escalante National Monument (which is supposed to be one of the most scenic roads in Utah). [caption id="attachment_1415" align="aligncenter" width="600"]
 And the scenery changes yet again[/caption] [caption id="attachment_1416" align="aligncenter" width="360"]
 But the views remain awesome[/caption] [caption id="attachment_1417" align="aligncenter" width="600"]
 Just another day in Utah![/caption] Had some awesome views as we went over a mountain, stopping many times along the way. Continued through towards Bryce Canyon National Park with a stopoff in Kodachrome Basin State Park. [caption id="attachment_1418" align="aligncenter" width="360"]
 It wouldn't look too big if Dad wasn't standing there![/caption] [caption id="attachment_1419" align="aligncenter" width="600"]
 The moon over Kodachrome[/caption] On the way to Bryce, we stopped at Mossy Cave for a little hike up the hill to the cave and a little waterfall. Yet another impromptu little stop that turned out to be pretty rewarding. [caption id="attachment_1420" align="aligncenter" width="360"]
 One of the few waterfalls around these parts[/caption] We then continued on to Bryce Canyon National Park. We did the first few viewpoints at Bryce, then backtracked a bit to hit the lodge for lunch. [caption id="attachment_1421" align="aligncenter" width="600"]
 Dad! The view is behind you![/caption]
  After lunch, we continued on to the end of the main road in Bryce, stopping at about every scenic viewpoint that was offered, including some pretty cool ones like Natural Bridge. [caption id="attachment_1423" align="aligncenter" width="360"]
 Technically, it's an arch not a bridge. There's no water running underneath![/caption] [caption id="attachment_1424" align="aligncenter" width="600"]
 One of the many critters we saw on the trip[/caption] When we got to the end, we did the Bristlecone Loop hike, saw the bristlecone tree that was believed to be over 1800 years old, then hit the last two big viewpoints. [caption id="attachment_1425" align="aligncenter" width="360"]
 It might look dead, but it isn't totally dead![/caption] [caption id="attachment_1426" align="aligncenter" width="360"]
 Yet another awesome view from Bryce Canyon![/caption] [caption id="attachment_1392" align="aligncenter" width="600"]
 Bryce Canyon Panorama[/caption] After that we meandered back the way we came then headed to Tropic. We checked in to the hotel, had a yummy pizza dinner, then settled in for the evening. Another long day of driving and spectacular views around every corner! Day 5 We woke up pretty early because we wanted to try to catch the sunrise in Bryce, especially since there is even a scenic viewpoint named Sunrise Point. There were plenty of other folks who had the same idea, but we made it there at the perfect time and had some spectacular views! I especially enjoyed the fact that it was about 50 degrees with a breeze when we got there. Needless to say, I was the only one in shorts and a t-shirt while most were bundled up with hoodies/fleeces and such. What a great break from Florida weather! [caption id="attachment_1428" align="aligncenter" width="600"]
 What a sunrise![/caption] [caption id="attachment_1429" align="aligncenter" width="600"]
 The morning sun really snazzies things up![/caption] [caption id="attachment_1430" align="aligncenter" width="600"]
 Sun peeking through[/caption] After enjoying the sunrise, we stopped at Ruby's Inn (how cool is that name?!) on the way out of town then headed over towards Zion National Park. [caption id="attachment_1431" align="aligncenter" width="600"]
 You really never know what will be around the next corner![/caption] Once we entered Zion, it was yet another terrain that was just entirely different than anything we had seen before. [caption id="attachment_1432" align="aligncenter" width="600"]
 Checkerboard[/caption] [caption id="attachment_1433" align="aligncenter" width="600"]
 Desert Bighorn Sheep[/caption] On the way into the park, we stopped to take the Canyon Overlook trail. It said it was 1 mile (round trip), but it was a pretty intense hike! [caption id="attachment_1434" align="aligncenter" width="600"]
 Some places they really had to make a path[/caption] [caption id="attachment_1435" align="aligncenter" width="600"]
 Even got to travel through a bit of a cave![/caption] Luckily, we were well rewarded for our efforts. At the end of the trail was a spectacular view over the main canyon of Zion. [caption id="attachment_1404" align="aligncenter" width="600"]
 What do you know, another amazing view in Utah![/caption] We made our way back to the car then drove the rest of the way into Zion. [caption id="attachment_1436" align="aligncenter" width="600"]
 Above that arch is the lookout from the Canyon Overlook Trail[/caption] [caption id="attachment_1437" align="aligncenter" width="600"]
 The red roads of Zion[/caption] Because of congestion and pollution issues, Zion moved to a bus system where everyone parks at the visitor's center then you take a bus through the park. [caption id="attachment_1438" align="aligncenter" width="600"]
 One of our buses had to stop for a little wildlife[/caption] We basically followed the guidelines in one of the books we had for a short visit so we hopped on the bus and headed to the Temple of Sinawava stop where the trailhead of the Riverside Trail Walk (2 miles round trip) was located. It was a low-medium difficulty trail and provided some really awesome views as the canyon got more and more narrow. We saw some wildlife and had a pretty enjoyable hike. [caption id="attachment_1446" align="aligncenter" width="360"]
 Hanging Gardens[/caption] [caption id="attachment_1440" align="aligncenter" width="360"]
 End of the main trail. Those crossing the river were embarking on a much more difficult journey.[/caption] [caption id="attachment_1441" align="aligncenter" width="600"]
 These chubby little squirrels were all over the trail and quite comfy with folks walking by[/caption] [caption id="attachment_1444" align="aligncenter" width="360"]
 Some harrowing cliffs along the trail[/caption] After that hike, we were ready to have some lunch so we caught the bus back to the Zion Lodge. [caption id="attachment_1442" align="aligncenter" width="360"]
 Pretty nice lunchtime view[/caption] We had lunch there, then went on the hike to Lower Emerald Pond, about 1.2 miles round trip. Good thing I brought my hiking flip-flops! ;-) It was another nice hike that ended at a pretty little oasis-like pool. [caption id="attachment_1443" align="aligncenter" width="360"]
 Lower Emerald Pool[/caption] On the way back, we really started to realize how much it had been heating up. We caught the bus back to the visitor center, finished some needed shopping, then hopped in the car that indicated it was 103 degrees outside. Quite a shift from our breezy 50 degree morning! We drove to Springdale, checked in, then ended up at Wildcat Willie's for some beer and dinner. Enjoyed chatting with some locals and watching some Olympics, then it was time to pack it in. What another long and awesome day! Finishing Zion pretty much finished the planned activities for the trip, but we were sure to be able to conjure a few more entertaining times on Thursday. Day 6 Woke up and enjoyed the view right outside of Zion. [caption id="attachment_1454" align="aligncenter" width="600"]
 The sunrise shines on Zion[/caption] Then we moseyed towards St. George, but took a detour through Snow Canyon State Park. [caption id="attachment_1448" align="aligncenter" width="600"]
 Not your every day roundabout[/caption] [caption id="attachment_1449" align="aligncenter" width="600"]
 Roadrunner![/caption] [caption id="attachment_1450" align="aligncenter" width="600"]
 Driving through Snow Canyon (though there is definitely not any snow there now!)[/caption] Enjoyed even more beautiful scenery, then passed through Gunlock State Park looping back to St. George. [caption id="attachment_1451" align="aligncenter" width="600"]
 Gunlock Reservoir[/caption] Then it was on to Vegas! [caption id="attachment_1452" align="aligncenter" width="360"]
 Sometimes we literally drive "through the mountains"[/caption] We drove a couple of passes down and back the strip, then got checked in to Luxor. [caption id="attachment_1453" align="aligncenter" width="600"]
 "Luxor" must mean something cool in Egyptian[/caption] We got settled in the room, then decided to explore all the craziness. We grabbed a few beers, did some shopping, then ate dinner are a seafood restaurant there. Dad's meal was OK, but mine was spectacular. On top of that, this place had a menu item more expensive than anything I had ever seen before, a sampler for $295! Definitely didn't go for that, but my meal was scrumptious. Afterwards, we explored the Luxor and Mandalay Bay casinos, then settled in to a few more beers. We did a little video poker at the bar so we could say we did some Vegas gambling. :-) [caption id="attachment_1456" align="aligncenter" width="600"]
 Beer and Gambling. Sounds like Vegas![/caption] We also stopped a bit to watch one of the active craps tables. It was pretty interesting even though we had no idea what was going on, haha. Then we packed it in pretty early so we'd be ready to head back in the morning. Of course, we were helped by being spoiled with all the 3.2% beer throughout the trip (many beers are limited to 3.2% alcohol in Utah). Drinking some regular beer hit us a little harder! :-) What a ridiculously awesome trip we have had! Many good times, spectacular views and variety! Another crazy, awesome Father-Son trip in the bag. :-) [caption id="attachment_1460" align="aligncenter" width="600"]
 Quite the traveling duo[/caption]
 "Let's just make the road go straight through that ridge."[/caption] On the way we just happened to stop for snacks at the same exit as the exotic car driving experience. If we are ever back out this way, we'll definitely have to add that to the activity list! [caption id="attachment_1358" align="aligncenter" width="600"]
 Checking out some awesome cars[/caption] We got to St. George, checked in, then headed to Red Lobster, which was surprisingly jammed for 4:30 in the afternoon. We had the slowest frickin' service ever, and the only quick thing was when he showed up to spill a beer. 1 hr and 45 minutes to eat an early dinner at Red Lobster! When we finally finished, we grabbed some beer and wound down at the hotel. Day 2 Woke up bright and early and drove down to the North Rim of the Grand Canyon. [caption id="attachment_1360" align="aligncenter" width="600"]
 The first of many sunrises seen from the road[/caption] We took the Bright Angel Point Trail (very short), which was a crazy little hike along the top of a spine extending out into the canyon so there was a huge dropoff on either side. http://www.youtube.com/watch?v=zgEA2kZ8cGo&w=600&h=338 The views were amazing, and we timed it perfectly so we just barely beat the crowds. [caption id="attachment_1361" align="aligncenter" width="600"]
 Dad on the trail[/caption] [caption id="attachment_1362" align="aligncenter" width="600"]
 One heckuva background![/caption] [caption id="attachment_1403" align="aligncenter" width="600"]
 Stitched Panorama from the North Rim[/caption] [caption id="attachment_1363" align="aligncenter" width="600"]
 A fairly tame (and obviously well-fed) squirrel[/caption] From there we headed to Kayenta and had an amazing and scenic drive on the way. Everything was just so amazing and so ridiculously different than anything in Tennessee or Florida. We stopped briefly in Kayenta then headed on to Monument Valley. It is a crazy set of HUGE rock outcroppings and was simply spectacular. [caption id="attachment_1364" align="aligncenter" width="600"]
 One of many views from the road[/caption] [caption id="attachment_1365" align="aligncenter" width="600"]
 Creeping up on Monument Valley[/caption] [caption id="attachment_1366" align="aligncenter" width="600"]
 Crazy rock features[/caption] After we took that in, we moseyed back to Kayenta. After stopping at 3 separate places, we finally discovered that there is no beer/alcohol sold in Kayenta because it is on the Navajo reservation. This didn't sit too well, especially with Dad, so we drove back through Monument Valley to Mexican Hat, which was the closest place with beer sales. [caption id="attachment_1367" align="aligncenter" width="600"]
 Heading back through Monument Valley[/caption] We had dinner there, and their alcohol provisions swayed Dad to remain so we ended up staying there and just having a relaxing evening in our tiny little room. [caption id="attachment_1368" align="aligncenter" width="600"]
 Our cozy little inn in Mexican Hat[/caption] It was nice to not have to drive an additional 40 miles after dinner and saved us another 40 miles of driving the next day. While all the views were amazing, one of our favorite moments came after we had settled in at the motel in Mexican Hat. Dad had the following conversation. Dad: Hello, I was calling to get the wifi password. Front Desk Lady: Ok, come down and I will enter it for you Dad: I'm sorry, what? Front Desk Lady: You need to bring your computer here so I can type in the password for you. If I tell it to you, the maids will get it and they go across the river and use up all the internet.That's right. Those dadjum maids use ALL the internet. And they don't even have the decency to stay on this side of the river! The things that go on in this bustling metropolis of Mexican Hat (population: ~100). Day 3 We woke up early and hit the road to the first lookout that was not too far from Mexican Hat (place close to Muley Point). [caption id="attachment_1378" align="aligncenter" width="600"]
 Sunrise over Mexican Hat[/caption] [caption id="attachment_1379" align="aligncenter" width="600"]
 A fuzzy pic of the rock formation for which Mexican Hat is named[/caption] [caption id="attachment_1395" align="aligncenter" width="600"]
 The rivers around here seem pretty busy, what with all the canyon carving and all[/caption] We enjoyed a nice sunrise view then continued on towards Natural Bridges National Monument. The map didn't provide the necessary info for us to realize exactly what was entailed in that little commute. As you may have noticed from some of the pictures thus far, there are tons of enormous mesas in this part of the country. Well this drive took us basically right up the face of one of those. They basically carved out a zigzag road right up the face of it so we could get to the top and continue on. It was pretty intense! [caption id="attachment_1380" align="aligncenter" width="600"]
 Um... Where does the road go?[/caption] [caption id="attachment_1381" align="aligncenter" width="600"]
 Oh that's right. Straight up the side of this cliff![/caption] After that it was smooth sailing until we reached Natural Bridges. It was basically a small loop to drive with short walks out to see each bridge. Nature creates some pretty amazing things! [caption id="attachment_1382" align="aligncenter" width="600"]
 Sipapu Bridge[/caption] [caption id="attachment_1383" align="aligncenter" width="600"]
 Kachina Bridge[/caption] [caption id="attachment_1384" align="aligncenter" width="600"]
 Owachomo Bridge[/caption] After Natural Bridges, we moseyed towards Hanksville. On the way, we stopped at an amazing overlook of Lake Powell, a location I have seen in a few wakeboarding videos. [caption id="attachment_1385" align="aligncenter" width="600"]
 Now where'd that wakeboard boat go...[/caption] After some pics we drove on to Hanksville, had lunch, then headed north to Goblin Valley. What a cool little set of rock formations! [caption id="attachment_1405" align="aligncenter" width="600"]
 A little trio of goblin greeters[/caption] [caption id="attachment_1406" align="aligncenter" width="600"]
 Panorama of all the little goblins[/caption] We were both constantly amazed how every turn seemed to reveal a unique and beautiful landscape. [caption id="attachment_1387" align="aligncenter" width="600"]
 We're definitely not in Florida/Tennessee anymore[/caption] From there it was back through Hanksville to Capitol Reef National Park. We took the main scenic road, then continued on to the dirt road to Capitol Gorge. It was a pretty fun exploration, and we got out for a nice little hike. We saw the petroglyphs and where some early settlers had carved their names into the rock. [caption id="attachment_1389" align="aligncenter" width="600"]
 Off-roadin'![/caption] [caption id="attachment_1390" align="aligncenter" width="360"]
 Exploring the canyon[/caption] [caption id="attachment_1391" align="aligncenter" width="360"]
 They don't look that huge in pictures until you have someone in there for a frame of reference[/caption] It was nice to get out and walk around, but when that sun comes out it gets blazing in a hurry! We made our way back through the scenic way then took the main road to panoramic point. Got some pics then finished our drive to Torrey. Had a nice dinner with some refreshing cold beers, then got settled in for a relaxing evening at the hotel. Another long, but awesome, day of spectacular views! Day 4 Today we slept in a bit (by our standards), had a little breakfast at the hotel then hit the road and went through Grand Staircase-Escalante National Monument (which is supposed to be one of the most scenic roads in Utah). [caption id="attachment_1415" align="aligncenter" width="600"]
 And the scenery changes yet again[/caption] [caption id="attachment_1416" align="aligncenter" width="360"]
 But the views remain awesome[/caption] [caption id="attachment_1417" align="aligncenter" width="600"]
 Just another day in Utah![/caption] Had some awesome views as we went over a mountain, stopping many times along the way. Continued through towards Bryce Canyon National Park with a stopoff in Kodachrome Basin State Park. [caption id="attachment_1418" align="aligncenter" width="360"]
 It wouldn't look too big if Dad wasn't standing there![/caption] [caption id="attachment_1419" align="aligncenter" width="600"]
 The moon over Kodachrome[/caption] On the way to Bryce, we stopped at Mossy Cave for a little hike up the hill to the cave and a little waterfall. Yet another impromptu little stop that turned out to be pretty rewarding. [caption id="attachment_1420" align="aligncenter" width="360"]
 One of the few waterfalls around these parts[/caption] We then continued on to Bryce Canyon National Park. We did the first few viewpoints at Bryce, then backtracked a bit to hit the lodge for lunch. [caption id="attachment_1421" align="aligncenter" width="600"]
 Dad! The view is behind you![/caption]
  After lunch, we continued on to the end of the main road in Bryce, stopping at about every scenic viewpoint that was offered, including some pretty cool ones like Natural Bridge. [caption id="attachment_1423" align="aligncenter" width="360"]
 Technically, it's an arch not a bridge. There's no water running underneath![/caption] [caption id="attachment_1424" align="aligncenter" width="600"]
 One of the many critters we saw on the trip[/caption] When we got to the end, we did the Bristlecone Loop hike, saw the bristlecone tree that was believed to be over 1800 years old, then hit the last two big viewpoints. [caption id="attachment_1425" align="aligncenter" width="360"]
 It might look dead, but it isn't totally dead![/caption] [caption id="attachment_1426" align="aligncenter" width="360"]
 Yet another awesome view from Bryce Canyon![/caption] [caption id="attachment_1392" align="aligncenter" width="600"]
 Bryce Canyon Panorama[/caption] After that we meandered back the way we came then headed to Tropic. We checked in to the hotel, had a yummy pizza dinner, then settled in for the evening. Another long day of driving and spectacular views around every corner! Day 5 We woke up pretty early because we wanted to try to catch the sunrise in Bryce, especially since there is even a scenic viewpoint named Sunrise Point. There were plenty of other folks who had the same idea, but we made it there at the perfect time and had some spectacular views! I especially enjoyed the fact that it was about 50 degrees with a breeze when we got there. Needless to say, I was the only one in shorts and a t-shirt while most were bundled up with hoodies/fleeces and such. What a great break from Florida weather! [caption id="attachment_1428" align="aligncenter" width="600"]
 What a sunrise![/caption] [caption id="attachment_1429" align="aligncenter" width="600"]
 The morning sun really snazzies things up![/caption] [caption id="attachment_1430" align="aligncenter" width="600"]
 Sun peeking through[/caption] After enjoying the sunrise, we stopped at Ruby's Inn (how cool is that name?!) on the way out of town then headed over towards Zion National Park. [caption id="attachment_1431" align="aligncenter" width="600"]
 You really never know what will be around the next corner![/caption] Once we entered Zion, it was yet another terrain that was just entirely different than anything we had seen before. [caption id="attachment_1432" align="aligncenter" width="600"]
 Checkerboard[/caption] [caption id="attachment_1433" align="aligncenter" width="600"]
 Desert Bighorn Sheep[/caption] On the way into the park, we stopped to take the Canyon Overlook trail. It said it was 1 mile (round trip), but it was a pretty intense hike! [caption id="attachment_1434" align="aligncenter" width="600"]
 Some places they really had to make a path[/caption] [caption id="attachment_1435" align="aligncenter" width="600"]
 Even got to travel through a bit of a cave![/caption] Luckily, we were well rewarded for our efforts. At the end of the trail was a spectacular view over the main canyon of Zion. [caption id="attachment_1404" align="aligncenter" width="600"]
 What do you know, another amazing view in Utah![/caption] We made our way back to the car then drove the rest of the way into Zion. [caption id="attachment_1436" align="aligncenter" width="600"]
 Above that arch is the lookout from the Canyon Overlook Trail[/caption] [caption id="attachment_1437" align="aligncenter" width="600"]
 The red roads of Zion[/caption] Because of congestion and pollution issues, Zion moved to a bus system where everyone parks at the visitor's center then you take a bus through the park. [caption id="attachment_1438" align="aligncenter" width="600"]
 One of our buses had to stop for a little wildlife[/caption] We basically followed the guidelines in one of the books we had for a short visit so we hopped on the bus and headed to the Temple of Sinawava stop where the trailhead of the Riverside Trail Walk (2 miles round trip) was located. It was a low-medium difficulty trail and provided some really awesome views as the canyon got more and more narrow. We saw some wildlife and had a pretty enjoyable hike. [caption id="attachment_1446" align="aligncenter" width="360"]
 Hanging Gardens[/caption] [caption id="attachment_1440" align="aligncenter" width="360"]
 End of the main trail. Those crossing the river were embarking on a much more difficult journey.[/caption] [caption id="attachment_1441" align="aligncenter" width="600"]
 These chubby little squirrels were all over the trail and quite comfy with folks walking by[/caption] [caption id="attachment_1444" align="aligncenter" width="360"]
 Some harrowing cliffs along the trail[/caption] After that hike, we were ready to have some lunch so we caught the bus back to the Zion Lodge. [caption id="attachment_1442" align="aligncenter" width="360"]
 Pretty nice lunchtime view[/caption] We had lunch there, then went on the hike to Lower Emerald Pond, about 1.2 miles round trip. Good thing I brought my hiking flip-flops! ;-) It was another nice hike that ended at a pretty little oasis-like pool. [caption id="attachment_1443" align="aligncenter" width="360"]
 Lower Emerald Pool[/caption] On the way back, we really started to realize how much it had been heating up. We caught the bus back to the visitor center, finished some needed shopping, then hopped in the car that indicated it was 103 degrees outside. Quite a shift from our breezy 50 degree morning! We drove to Springdale, checked in, then ended up at Wildcat Willie's for some beer and dinner. Enjoyed chatting with some locals and watching some Olympics, then it was time to pack it in. What another long and awesome day! Finishing Zion pretty much finished the planned activities for the trip, but we were sure to be able to conjure a few more entertaining times on Thursday. Day 6 Woke up and enjoyed the view right outside of Zion. [caption id="attachment_1454" align="aligncenter" width="600"]
 The sunrise shines on Zion[/caption] Then we moseyed towards St. George, but took a detour through Snow Canyon State Park. [caption id="attachment_1448" align="aligncenter" width="600"]
 Not your every day roundabout[/caption] [caption id="attachment_1449" align="aligncenter" width="600"]
 Roadrunner![/caption] [caption id="attachment_1450" align="aligncenter" width="600"]
 Driving through Snow Canyon (though there is definitely not any snow there now!)[/caption] Enjoyed even more beautiful scenery, then passed through Gunlock State Park looping back to St. George. [caption id="attachment_1451" align="aligncenter" width="600"]
 Gunlock Reservoir[/caption] Then it was on to Vegas! [caption id="attachment_1452" align="aligncenter" width="360"]
 Sometimes we literally drive "through the mountains"[/caption] We drove a couple of passes down and back the strip, then got checked in to Luxor. [caption id="attachment_1453" align="aligncenter" width="600"]
 "Luxor" must mean something cool in Egyptian[/caption] We got settled in the room, then decided to explore all the craziness. We grabbed a few beers, did some shopping, then ate dinner are a seafood restaurant there. Dad's meal was OK, but mine was spectacular. On top of that, this place had a menu item more expensive than anything I had ever seen before, a sampler for $295! Definitely didn't go for that, but my meal was scrumptious. Afterwards, we explored the Luxor and Mandalay Bay casinos, then settled in to a few more beers. We did a little video poker at the bar so we could say we did some Vegas gambling. :-) [caption id="attachment_1456" align="aligncenter" width="600"]
 Beer and Gambling. Sounds like Vegas![/caption] We also stopped a bit to watch one of the active craps tables. It was pretty interesting even though we had no idea what was going on, haha. Then we packed it in pretty early so we'd be ready to head back in the morning. Of course, we were helped by being spoiled with all the 3.2% beer throughout the trip (many beers are limited to 3.2% alcohol in Utah). Drinking some regular beer hit us a little harder! :-) What a ridiculously awesome trip we have had! Many good times, spectacular views and variety! Another crazy, awesome Father-Son trip in the bag. :-) [caption id="attachment_1460" align="aligncenter" width="600"]
 Quite the traveling duo[/caption]
Subscribe to:
Posts (Atom)

